Tokenizing a card in a mobile app
Use the flexible ProcessOut UI to collect card details or build your own form.
Once you have an invoice for a payment, the next step is usually to generate a payment source token to
represent the customer's payment details. The most common example of a payment source is a card token. (See the page about accepting card payments) to learn more about card tokens and their place in the payment flow.)
We provide client-side SDKs for iOS and Android. These let you generate a card token directly from a customer's details as described below. You can also use our SDKs to accept payment with Apple Pay and Google Pay, which are described separately.
Tokenization UI
The ProcessOut mobile SDKs offer pre-built, customizable forms that you can embed in your app. They allow you to control the look and feel of the interface while keeping your integration simple.
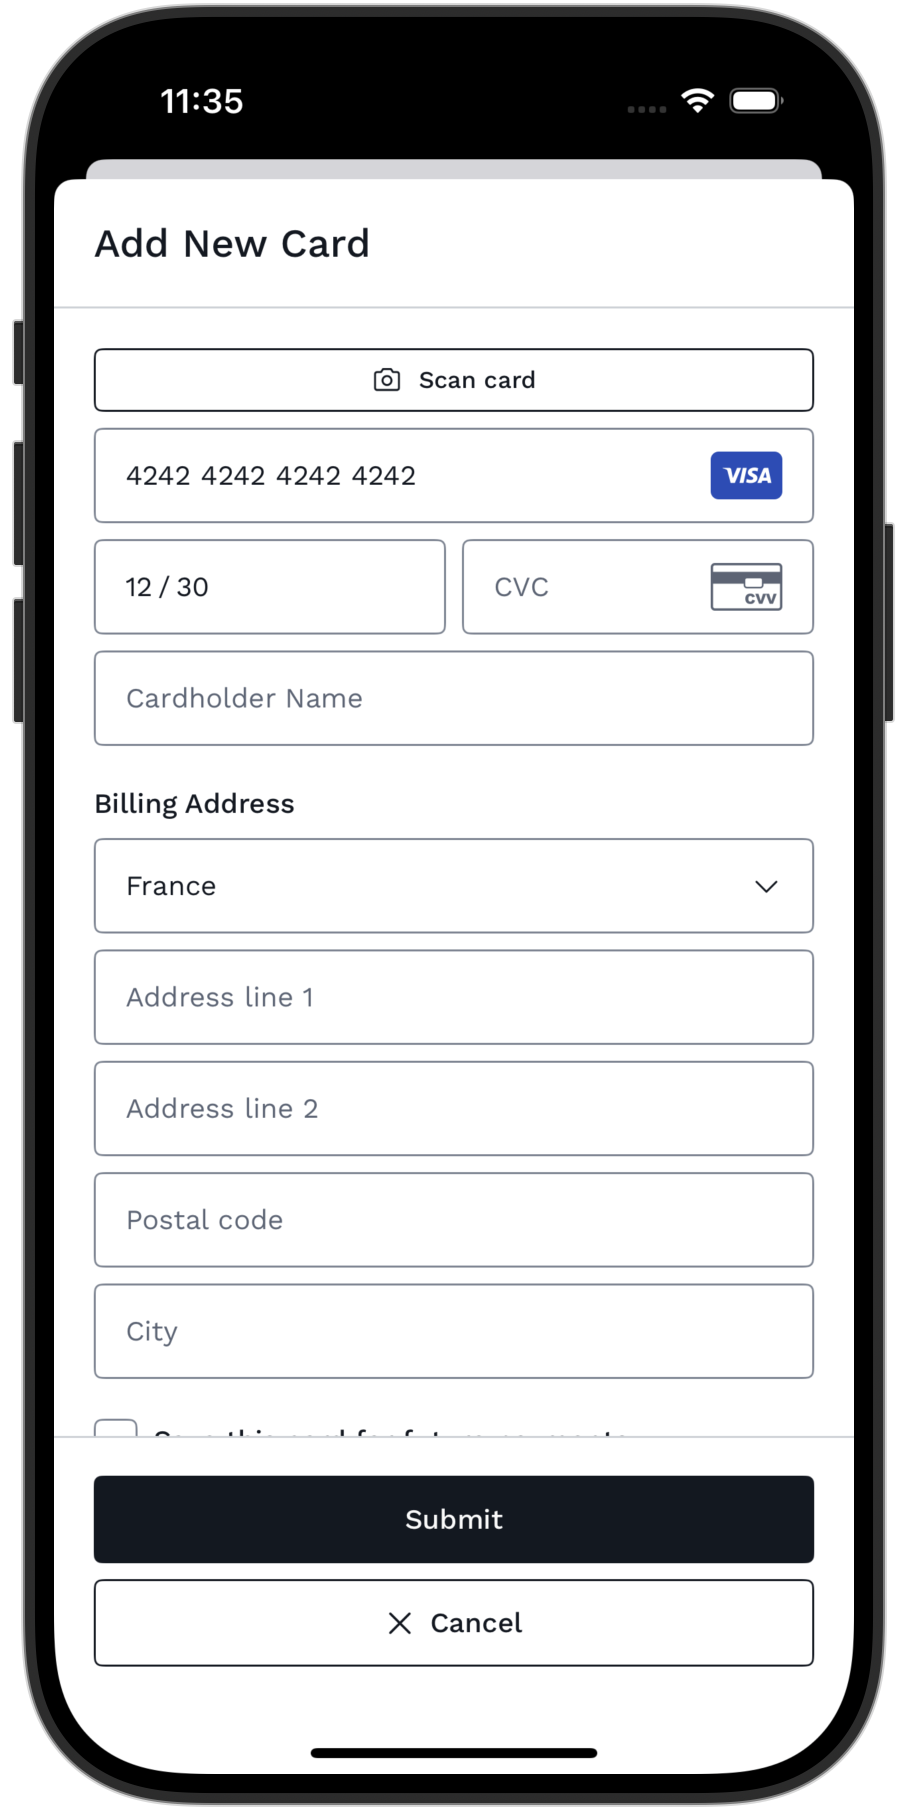
Tokenization UI example on iOS
Integrating the tokenization UI
First, you should obtain and set up the SDK in your code using the instructions for iOS or Android, as appropriate.
We offer a UI to facilitate card tokenization. For SwiftUI users, there is POCardTokenizationView, which provides an interface for users to enter their card details. If you are using UIKit, we provide POCardTokenizationViewController.
The creation process for both is similar, with the key difference being that you must pass the style during initialization for the UIKit version, as it cannot be set later.
The Android SDK provides POCardTokenizationLauncher to start the activity.
import ProcessOutUI

POCardTokenizationView { result in
    switch result {
    case .success(let card):
        // todo: handle tokenized card
    case .failure(let failure):
        // todo: handle tokenization failure
    }
}
// 1) Initialize the launcher in the onCreate() method of your Activity or Fragment.
private lateinit var launcher: POCardTokenizationLauncher
override fun onCreate(savedInstanceState: Bundle?) {
super.onCreate(savedInstanceState)
launcher = POCardTokenizationLauncher.create(
from = this,
delegate = object : POCardTokenizationDelegate {}
) { result ->
result.onSuccess { card ->
// Handle tokenized card.
}.onFailure { failure ->
// Handle failure.
}
}
}
// 2) Launch the activity.
launcher.launch(POCardTokenizationConfiguration())After the tokenization is complete, the view calls a completion handler you passed when creating it with the card object or failure if the implementation was unable to recover from failure.
Configuration
The view accepts a configuration that allows you to customize the information collected. Configuration options include:
- The title displayed on the screen.
- Whether to collect card and cardholder's information and corresponding text fields configuration.
- Tokenize button title and icon.
- Whether the user should be able to manually cancel the flow as well as cancel button properties (title, icon and confirmation).
- Metadata to be assigned to the card token.
Check the SDK reference for iOS and Android. The example below shows how to create and pass this configuration.
let configuration = POCardTokenizationConfiguration(
    cardholderName: nil,
    submitButton: .init(
        title: "Continue", icon: Image(systemName: "checkmark")
    ),
    cancelButton: nil, // Hides cancel button
    metadata: ["key": "value"]
)

/// Create view with custom configuration
POCardTokenizationView(configuration: configuration) { result in ... }
POCardTokenizationConfiguration(
title = "Add New Card",
isCardholderNameFieldVisible = true,
billingAddress = POCardTokenizationConfiguration.BillingAddressConfiguration(
// Configure how to collect the billing address.
),
primaryActionText = "Submit",
secondaryActionText = "Cancel",
cancellation = POCancellationConfiguration(
secondaryAction = true,
backPressed = false,
dragDown = true,
touchOutside = false
),
metadata = null, // Metadata related to the card.
style = POCardTokenizationConfiguration.Style(
// Customize the look and feel.
)
)Billing address configuration
The billing address configuration is part of the overall configuration when creating the view. You can set the collection preference using the mode property, with the following options:
Automatic: The implementation automatically decides what information is needed.Never: No billing info is collected.Full: As much details as possible are collected.
You can also restrict the supported countries that the user can select from by setting the countryCodes property.
If you know the customer's billing address in advance, you can set the defaultAddress. When this is set, and the collection mode is other than never, the customer can modify the default address.
The attachDefaultsToPaymentMethod property can be set to true if you want the implementation to fill in any fields the user didn't enter with defaults. This is especially useful in combination with the never collection mode to set an address during tokenization without allowing the user to change it.
The SDK automatically adjusts the collected billing address details based on the selected country, including the collected fields and their names.
Check the SDK reference for iOS and Android and example below for additional details.
let addressConfiguration = POCardTokenizationConfiguration.BillingAddress(
  mode: .automatic,
  countryCodes: ["GB", "US"],
  defaultAddress: .init(zip: "M44 5YN", countryCode: "GB")
)
let configuration = POCardTokenizationConfiguration(billingAddress: addressConfiguration)
POCardTokenizationConfiguration(
billingAddress = BillingAddressConfiguration(
mode = CollectionMode.Automatic,
countryCodes = setOf("GB", "US"),
defaultAddress = POContact(
countryCode = "GB",
zip = "M44 5YN"
)
)
)Card saving
The SDK provides an option to present users with a choice to save their card for future payments. By default, this option is disabled. To enable it, set the isSavingAllowed flag to true when creating the POCardTokenizationConfiguration:
let configuration = POCardTokenizationConfiguration(isSavingAllowed: true)After the card details are collected and a card token is successfully created by ProcessOut, the user’s choice is reported to the delegate’s cardTokenization(didTokenizeCard:shouldSaveCard:) method.
If shouldSaveCard is true, your implementation can proceed with one of the following approaches:
- Create a customer token and assign the card to it in separate calls.
- Authorize your invoice and save the card in a single step.
For further guidance, refer to the customer token creation documentation.
Card post-processing on iOS
To not only tokenize the card but to additionally process it before view completes, pass a delegate that implements the cardTokenization(didTokenizeCard:shouldSaveCard:) method.
For example, you can assign the tokenized card to a specific customer token for future invoice authorizations. This flow would look like this:
func cardTokenization(didTokenizeCard card: POCard, shouldSaveCard: Bool) async throws {
    // Call your backend to create a customer and customer token, if not previously done.
    let request = POAssignCustomerTokenRequest(
        customerId: "cust_otbTu8aabNSAntSVZuqXCKScltFtxo1h",
        tokenId: "tok_UGimEkEqkv1Dr1gZV3G5U68z7xlF0HVo",
        source: card.id
    )
    let customerTokensService = ProcessOut.shared.customerTokens
    try await customerTokensService.assignCustomerToken(request: request, threeDSService: threeDSService)
}
In addition to mentioned above delegate can be also used to:
- Evaluate card eligibility.
- Change the preferred scheme if multiple schemes are available.
- Observe events to gain insights into user actions.
- Decide whether the user should be able to continue when certain error occurs.
Please refer to delegate reference for additional information.
Card post-processing on Android
Communication with the card tokenization activity is facilitated via POCardTokenizationDelegate interface. Pass a delegate that implements processTokenizedCard function to further process the tokenized card before the activity completes.
For example, you can assign the tokenized card to a specific customer token for future invoice authorizations. This flow would look like this:
class Delegate : POCardTokenizationDelegate {

    override suspend fun processTokenizedCard(
        card: POCard,
        saveCard: Boolean
    ): ProcessOutResult<Any> {
        // Call your backend to create a customer and a customer token, if not previously done.
        return ProcessOut.instance.customerTokens.assign(
            request = POAssignCustomerTokenRequest(
                customerId = "cust_otbTu8aabNSAntSVZuqXCKScltFtxo1h",
                tokenId = "tok_UGimEkEqkv1Dr1gZV3G5U68z7xlF0HVo",
                source = card.id
            ),
            threeDSService = create3DSService()
        )
    }
}
In addition to mentioned above the delegate can also be used to:
- Evaluate card eligibility.
- Change the preferred scheme if multiple schemes are available.
- Observe events to gain insights into user actions.
- Decide whether user should be able to continue when certain error occurs.
Style
To additionally customize the UI on iOS you should create a custom style and provide it when creating POCardTokenizationViewController for UIKit, or with the cardTokenizationStyle method for SwiftUI.
You can pass a custom style in the configuration on Android. Check the SDK reference for more information.
let style = POCardTokenizationStyle(
    title: .init(
        color: .black, typography: .init(font: .systemFont(ofSize: 14))
    ),
    ...
)

POCardTokenizationView { _ in }.cardTokenizationStyle(style)
POCardTokenizationConfiguration(
style = POCardTokenizationConfiguration.Style(
title = POTextStyle(
colorResId = R.color.text_primary,
type = POTextType(
textSizeSp = 20,
lineHeightSp = 28,
weight = POTextType.Weight.MEDIUM
)
),
// ...
)
)Inline presentation
iOS
POCardTokenizationView can be embedded inline within your interface by specifying the .inline presentation context using cardTokenizationPresentationContext(_:) method. This disables internal scrolling and adjusts the layout to remove default insets.
When using inline presentation, you may opt to hide the default cancel and/or submit buttons and provide custom controls instead. To do so, set cancelButton and submitButton to nil in the configuration:
let configuration = POCardTokenizationConfiguration(
    submitButton: nil,
    cancelButton: nil
)
Manual Control
If you omit the built-in controls, you can manage submission and cancellation externally via a POCardTokenizationComponent. To do so:
- Instantiate the component with the required configuration, delegate, and completion handler.
- Create the view using this component.
- Use the
tokenize()andcancel()methods to trigger actions programmatically:
let component = POCardTokenizationComponent(...)
let view = POCardTokenizationView(component: component)
component.tokenize()
Android
Using the POCardTokenizationViewComponent instead of the launcher allows you to embed the card form view directly into your screen layout.
// 1) Initialize the view component in the onCreate() method of your Activity or Fragment.

private lateinit var viewComponent: POCardTokenizationViewComponent

override fun onCreate(savedInstanceState: Bundle?) {
    super.onCreate(savedInstanceState)
    viewComponent = POCardTokenizationViewComponent.create(
        from = this,
        configuration = POCardTokenizationViewComponentConfiguration(),
        delegate = object : POCardTokenizationDelegate {}
    ) { result ->
        // Remove the view from the screen layout.
        binding.container.removeView(viewComponent.view)

        result.onSuccess { card ->
            // Handle tokenized card.
        }.onFailure { failure ->
            // Handle failure.
        }
    }
}

// 2) Add the view to the screen layout.

binding.container.addView(viewComponent.view)
You can hide the default submit and cancel buttons if you prefer to use custom controls instead. To do so, set submitButton and/or cancelButton to null in the POCardTokenizationViewComponentConfiguration. To trigger actions programmatically, use the tokenize() and cancel() methods provided by the view component.
POCardTokenizationViewComponentConfiguration(
    submitButton = null,
    cancelButton = null
)

// Submits the form for card tokenization.
viewComponent.tokenize()

// Cancels the ongoing card tokenization.
viewComponent.cancel()
If you need to restart the card form, call the restart() method, optionally providing a new configuration.
// Restarts the card tokenization with the current configuration.
viewComponent.restart()

// Restarts the card tokenization with the new configuration.
viewComponent.restart(configuration = POCardTokenizationViewComponentConfiguration())
Optionally you may listen to the view state changes via the POCardTokenizationDelegate. Implement the
method onStateChanged() to receive the POCardTokenizationState and update your UI accordingly. For example, you can synchronize your controls state with the form processing.
class Delegate : POCardTokenizationDelegate {

    override fun onStateChanged(state: POCardTokenizationState) {
        // Bind the state to your custom controls.
        state.submitAllowed
        state.submitting
    }
}
API bindings
For a more customizable approach, use our API bindings directly to tokenize a card.
The code sample below shows how to tokenize a set of card details that you have already received from the customer (you can use any suitable UI to do this). The token itself is just a string value that represents the card for this particular payment.
do {
    // First, create a tokenization request with card details. Check `init` for
    // additional parameters that could be passed when creating a request.
    let tokenizationRequest = POCardTokenizationRequest(
        number: "4242424242424242", expMonth: 4, expYear: 30, cvc: "737"
    )

    // Execute request then send card.id to your backend to charge a customer.
    let card = ProcessOut.shared.cards.tokenize(request: tokenizationRequest)
} catch {
    // Inspect `error` for the detailed error reason.
}
// Call the suspend function within a coroutine scope.
val tokenizationRequest = POCardTokenizationRequest(
number = "4242424242424242",
expMonth = 4,
expYear = 30,
cvc = "737"
)
ProcessOut.instance.cards
.tokenize(tokenizationRequest)
.onSuccess { card ->
// Send the card ID to your backend to charge a customer.
}.onFailure { failure ->
// Handle failure.
}Updated 9 months ago
What’s Next
Once you have generated the card token successfully, you can use it to process a payment. For Cardholder Initiated Transactions, you will first need to authorize the payment on the client before capturing it on the server. You may also be interested in saving the token to capture future payments.