Scanning a card details
The ProcessOut mobile SDKs offer a pre-built form that you can embed in your app to allow users to scan payment cards instead of entering details manually. This feature provides a seamless user experience while enabling you to control the interface’s look and feel.
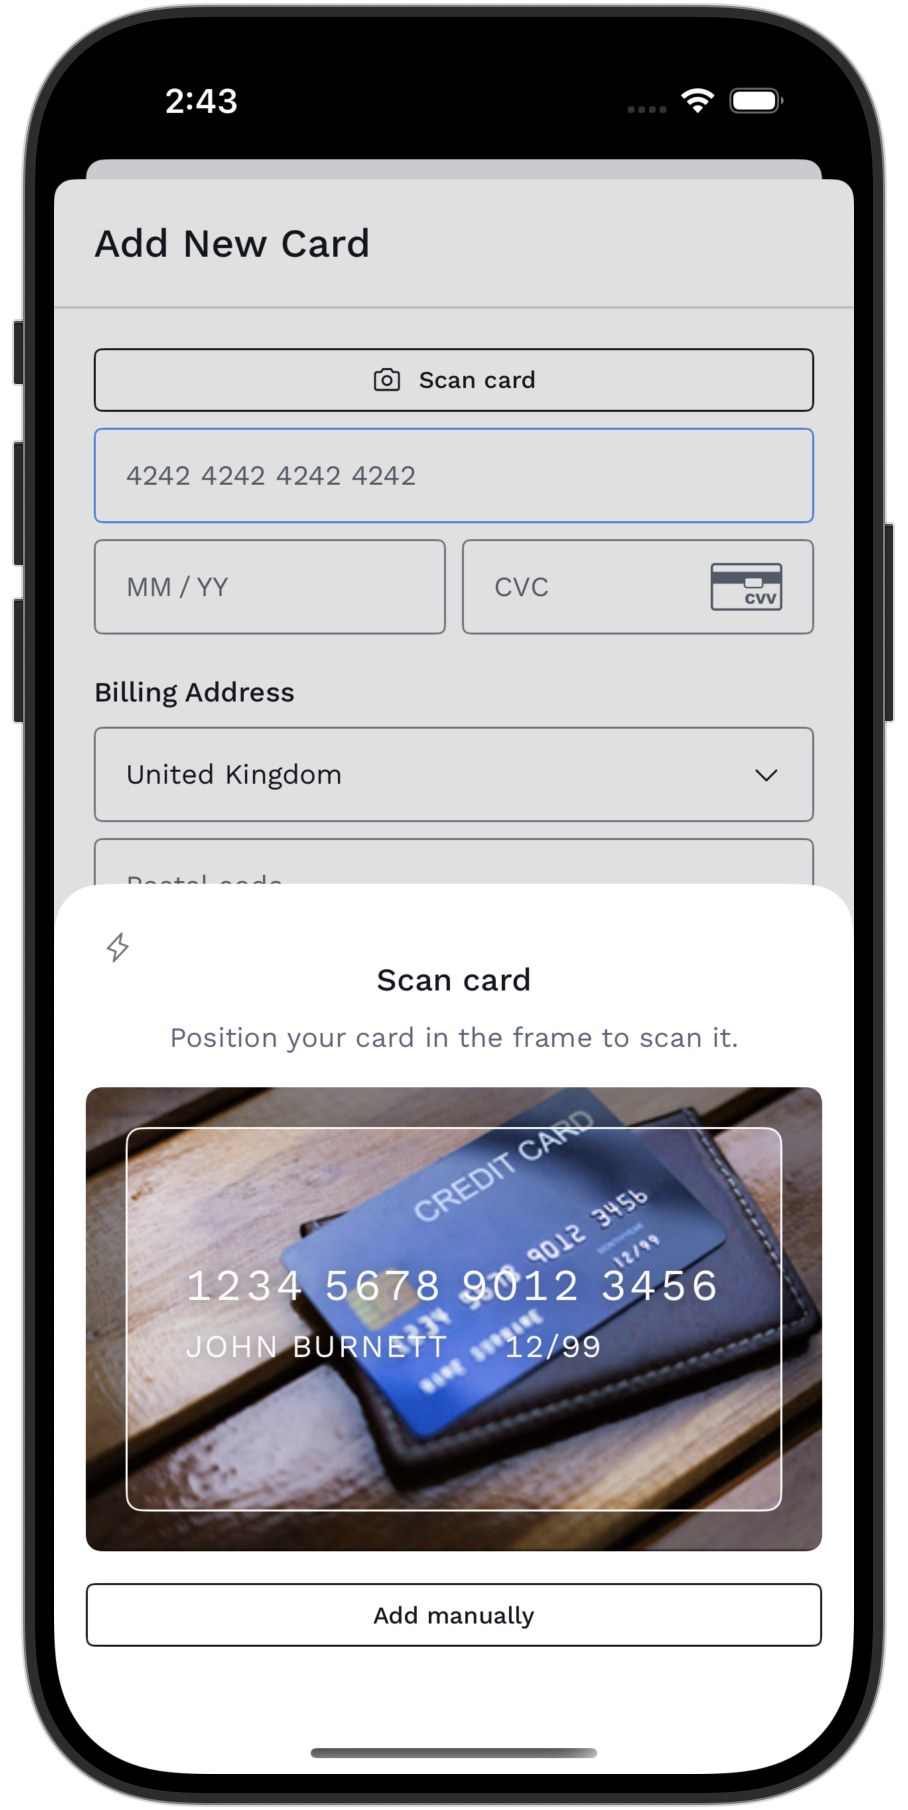
Card Scanner UI example on iOS
iOS
Getting Started
The card scanner requires an access to the camera to function properly. Ensure your app requests camera permissions in the Info.plist file by adding the NSCameraUsageDescription key with a user-facing description of why the camera is needed. For example:
<key>NSCameraUsageDescription</key>
<string>The camera is used to scan payment cards.</string>Do not attempt to use card scanner without providing a camera usage description. The absence of it will cause your app to crash when accessing the camera.
To use the card scanner, obtain and set up the ProcessOut SDK in your iOS project. Follow the SDK’s setup instructions for integration details.
SwiftUI
The SDK provides the POCardScannerView , a ready-to-use SwiftUI view for card scanning. It includes a callback to handle the scanned card details or any scanning failure.
import ProcessOutUI

POCardScannerView { result in
    switch result {
    case .success(let scannedCard):
        // Handle the scanned card details
    case .failure(let failure):
        // Handle the scanning failure
    }
}
UIKit
If your app relies on UIKit, you can embed the POCardScannerView using UIHostingController into your UIKit view hierarchy. For more information, refer to Apple's documentation on UIHostingController.
import ProcessOutUI

let viewController = UIHostingController(
    rootView: POCardScannerView { result in ... }
)
Configuration
The POCardScannerView supports customization through a configuration object. The following options are available:
-
Title and Description: Customize the text displayed on the screen.
-
Cancel Button: Configure properties such as title, icon, and confirmation dialog.
Example usage:
let configuration = POCardScannerConfiguration(
    title: "Scan your card",
    description: "", // Removes description
    cancelButton: .init(
        icon: Image(systemName: "xmark"),
        confirmation: .init() // Adds a confirmation dialog
    )
)

POCardScannerView(configuration: configuration) { result in ... }
Styling
To further customize the appearance of the POCardScannerView, create a style instance and pass it when invoking the cardScannerStyle method.
The SDK includes a default implementation, PODefaultCardScannerStyle, that accepts following adjustments:
-
Title and Description Styles: Modify font, color, and other text attributes.
-
Torch Toggle Style: Adjust appearance for the flashlight toggle.
-
Video Preview Styling: Customize the camera preview area.
-
Card Information Styling: Update the appearance of scanned card details.
-
Cancel Button Style: Adjust button appearance.
Example usage:
let style = PODefaultCardScannerStyle(
    videoPreview: .init(backgroundColor: .systemBackground, border: .clear, ...),
    cancelButton: .primary,
    ...
)

POCardScannerView { result in
    // Handle result
}
.cardScannerStyle(style)
Advanced Customization
For more extensive UI modifications, implement the POCardScannerStyle protocol directly. For example:
struct CustomCardScannerStyle: POCardScannerStyle {

    func makeBody(configuration: Configuration) -> some View {
        VStack(spacing: 24) {
            Text("Scan Card")
                .font(.headline)
                .foregroundColor(.black)
            configuration.videoPreview
                .background(Color.black)
                .clipShape(RoundedRectangle(cornerRadius: 10))
            configuration.card?.number
                .font(.body)
                .foregroundColor(.black)
            configuration.cancelButton
        }
        .padding()
        .background(backgroundColor)
    }

    var backgroundColor: Color {
        .white
    }
}
You could refer to the PODefaultCardScannerStyle implementation for additional guidance.
Android
Getting Started
The card scanner is available in the ProcessOut Android SDK UI module since version 4.28.0. Follow the SDK’s setup instructions for integration details.
implementation("com.processout:processout-android-ui:<version>")Ensure that your app requests camera permission in the manifest file.
<uses-feature android:name="android.hardware.camera.any" />
<uses-permission android:name="android.permission.CAMERA" />
You can configure your app to automatically download the ML Kit text recognition model to the device's Play Services when the app is installed or updated. This is optional but recommended for a seamless experience, as the user won't need to wait for the model download once the card scanner is started.
<application
    <meta-data
        android:name="com.google.mlkit.vision.DEPENDENCIES"
        android:value="ocr" />
</application>
The SDK provides the POCardScannerLauncher to start the activity and handle the result.
// 1) Initialize the launcher in the onCreate() method of your Activity or Fragment.

private lateinit var launcher: POCardScannerLauncher

override fun onCreate(savedInstanceState: Bundle?) {
    super.onCreate(savedInstanceState)
    launcher = POCardScannerLauncher.create(from = this) { result ->
        result.onSuccess { scannedCard ->
            // Handle the scanned card.
        }.onFailure { failure ->
            // Handle the failure.
        }
    }
}

// 2) Launch the activity.

launcher.launch(POCardScannerConfiguration())
Configuration
The launcher supports customization through the POCardScannerConfiguration.
The following options are available:
- Title and Description: Customize the text displayed on the screen.
- Cancel Button: Configure properties such as text, icon, and confirmation dialog.
- Cancellation: Specify behaviour of the bottom sheet.
- Scan Expired Card: Whether to scan expired cards if detected.
- Custom Style: Adjust the look and feel.
POCardScannerConfiguration(
    title = "Scan card",
    description = null, // Uses default.
    cancelButton = CancelButton(
        text = "Cancel",
        icon = PODrawableImage(
            resId = R.drawable.po_icon_close,
            renderingMode = POImageRenderingMode.ORIGINAL
        ),
        confirmation = POActionConfirmationConfiguration() // Enables confirmation dialog.
    ),
    cancellation = POCancellationConfiguration(
        backPressed = false,
        dragDown = true,
        touchOutside = false
    ),
    shouldScanExpiredCard = false, // Will ignore if expired card is detected.
    style = POCardScannerConfiguration.Style(
        // Custom style.
    )
)
Styling
POCardScannerConfiguration.Style allows to customize the appearance of:
- Title and Description: Modify font, color, and other text attributes.
- Camera Preview: Customize the camera preview area.
- Card Details: Customize the appearance of the scanned card details.
- Torch Toggle: Adjust appearance of the flashlight toggle.
- Cancel Button: Adjust button appearance.
- Dialog: Customize confirmation dialog.
- Background Color: Custom background color of the bottom sheet.
POCardScannerConfiguration(
    style = POCardScannerConfiguration.Style(
        title = POTextStyle(
            colorResId = R.color.text_primary,
            type = POTextType(
                textSizeSp = 18,
                lineHeightSp = 24,
                weight = POTextType.Weight.MEDIUM
            )
        ),
        // ...
    )
)
Updated 9 months ago